![Smoothx_Logo_FC_White_RGB.png]](https://support.smoothx.com/hs-fs/hubfs/Smoothx_Logo_FC_White_RGB.png?height=20&name=Smoothx_Logo_FC_White_RGB.png)
Smoothx Tools - User Account Settings
User account settings allow you to manage team members across all Smoothx Tools, e.g. ProScan+ and Cost+.
In this section you can control:
Multiple Smoothx Tools Accounts
Users that have more than one Smoothx Tools login can now switch between their instances with a single login. This is done by switching Teams.
User (Members) Settings

In this section, you can manage your Smoothx Tools Users:
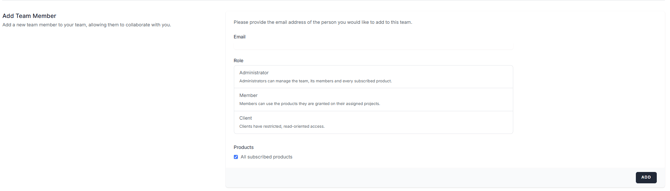
- Add Team Members
- Add a new team member to your team, allowing them to collaborate with you.
- Manage Team Members
- All of the people who are part of this team. Edit Permissions and Remove if required.

- Member Access
- Control which products and projects each member can use. Members with no product restrictions can use everything the team subscribes to.

Each User is assigned:
-
A user role
-
Product(s)
-
Project(s)
- Allowed Actions
Add Team Members
When adding a team member, there are three different roles:
- Administrator
- Member
- Client
User Roles
Owner
- The account used to register the company on Smoothx Tools.
- Behaves as an Administrator everywhere.
- Cannot be removed from the Team and has no Edit Access button (owners always have everything).
Administrator
- Manages the team: invite/remove members, change roles, edit member access, the Settings page, Cost+ layouts, Import+, the Resource page.
- Sees every project in the company.
- Administrators should be limited to those overseeing their company's user administration.
Member
- Can use the products they are granted on those projects they have access to.
- Can open project settings inside Cost+/Extractus for those projects.
- Does not see Users or Settings in the Smoothx Tools main menu.
Client
- Read-oriented external role. In Cost+ and Smooth Invoicing, they land straight on the invoicing tab; project settings and edit actions are hidden.
- Same project-list rule as Members.
Products
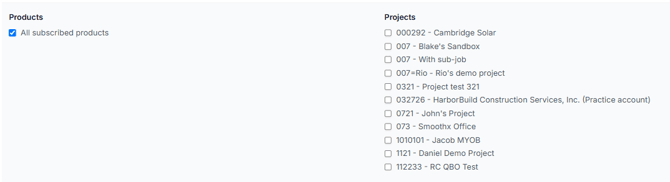
Users can be assigned to specific products (or all products).
By default, it will show All subscribed products.
Remove the tick from All subscribed products to see all available tools.
Add Team Members
- Enter the Email Address
- Select the User Role
- Select the Product (remove tick from All subscribed products if required)
- Click Add
User Invites (Email)
An invitation email is sent to new users.
Until the user accepts, they sit under Pending Team Invitations, where the invite can be cancelled.
Two things can happen when they click the invite email:
No existing Smoothx login
- Create Account & Join: they enter their name
- Set their own password (the email is pre-filled and locked).
- They land on the dashboard already inside the team.
Already has a Smoothx login (e.g. works with two customers, or already belongs to another team)
- Accept Invitation: the invitation is attached to their existing login. If they open the register link instead, the app tells them to log in first and accept from the email — that message is expected, not a bug.
- After accepting, they pick the company from Switch Teams in the top-right dropdown.
Setting Passwords
This replaces the old user creation, where an admin typed a phone number as the password.
Smoothx Support no longer sets or knows member passwords.
Team Members
View and udpate the user role permissions allocated to a user, edit user permissions and remove a user.
Edit User Roles
- Click the Role name
- Select a different Role
- Click Save
Remove Members
Members can be deleted by clicking Remove.
A member can also remove themselves via Leave Team.
The owner can never be removed.
Member Access
Manage user access for:
- Product(s)
- Project(s)
- Allowed Actions
Only Smoothx Tools Admins can Edit Access
Edit Product & Project Access
Control which Smoothx Tools Products users have access to, along with allocating specific projects.
Project access is limited to specific tools like Cost Plus.
- Click Edit Access
- Select the Products - All subscribed products is ticked by default; automatically includes anything the company subscribes to later.
- Select Projects - Tick the Procore projects a Member/Client may open.
- Click Save Access
Edit Allowed Actions (ProScan+)
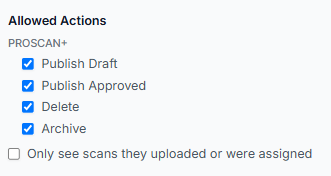
Control what actions users can take when using ProScan+
- Click Edit Access
- Select Allowed Actions
- Publish Draft - Publishing invoices whose status is Draft or Revise & Resubmit to Procore
- Publish Approved - Publishing invoices with any further status (Pending, Approved) to Procore
- Delete - Deleting scans (single or bulk)
- Archive - Archiving and un-archiving scans
- Only see scans they uploaded or were assigned (See below)
- Click Save Access
Only See Scans They Uploaded or Were Assigned
By default every user sees all of the scans in My Scans and the Archive. Enabling this permission for a user limits their My Scans (active and archived) to:
- scans they uploaded
- scans shared with them via Asssign To button
Publishing Draft & Approved Setting
Publishing is split into two permissions controlling who can publish to Procore, e.g. data-entry staff can publish Draft scans to Procore, while reserving approved publishes for a manager:
- Publish Draft only can publish invoices while they're in Draft / Revise & Resubmit status. If they try to publish an invoice that's already Pending or Approved, the publish is refused with a message (single publish) or that scan is skipped with a count message (bulk publish).
- Publish Approved only can publish escalated-status invoices but not drafts.
Unchecking both removes publishing entirely.